Showing posts with label stop motion. Show all posts

Saturday, 28 April 2012

Trial and errors of Alfred's head! ... Part 2!

Let me update you on Alfred's head, number 2 (with a few lessons learnt along the way!)


So this time after I'd screwed up a foil ball like with the first head, I made sure that I pressed in with my thumbs for the eye sockets. After I smoothed it all out, I baked it at 90c (fan) for 10 minutes. 


Then I gave him a nose and put him back in the oven for another 10 minutes on 90c (fan)


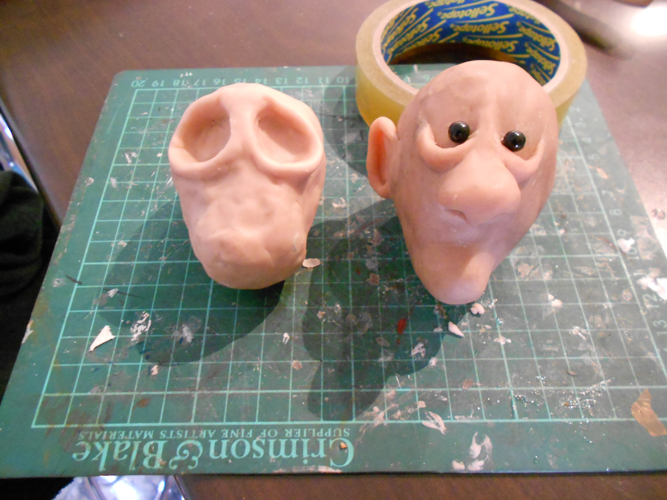
Next I gave him a chin and some ears and put him back in the oven. Now we have a much more realistic looking Alfred.


When you compare the two you can see the difference. Since Alfred is supposed to be a skinny character, the face on the right works much better. 


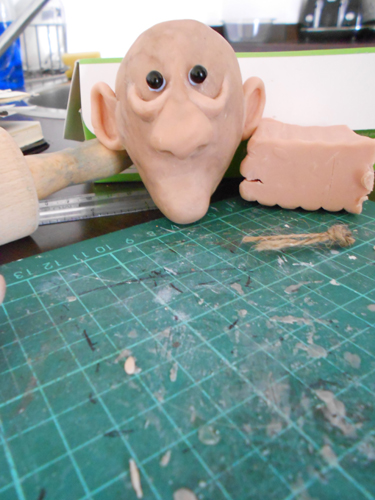
Next up was the eyebrows. I took some of the messiest fluffiest material ever and glued it onto two pieces of card, building it up in stages until it looked more bushy n less tamed. I was going to glue a piece of wire to the back of the card and then slot it into the face so the eyebrows would be moveable but then...DUN DUN DUNNN...


It broke! And yes...that's the tool I tried to do it with (to the right of the picture) Now Alfred had to be botched up, so with a bit of Blutack I stuck his eyebrows on!


Ta-dahhh! All fixed up! And now it's time for a few expressions. I'm still not sure about these, but for now they're looking a little something like this...


More to come soon!!


Trial and errors of Alfred's head! ... Part 1!

With advice from good 'ol Ashleigh Hutchinson, I got to work on Alfred's head. I'd never done anything like this before so let's just call the first one an experiment! 

I began with a ball shape made from tinfoil, rolled out a thin layer of flesh coloured Sculpey clay and then covered it over the foil. Smoothing is tedious and takes a bit of time if you want to completely vanish all of the cracks in the clay. It helps if the Sculpey has been warmed and kneaded in your hands previous to this, or...as I did it...stuck it in front of the heater for a couple of minutes! Once I had a head-looking shape, I put it in the oven at 90c (fan) for 10 minutes. I figured it would be easier to do it this way than to build the whole face up in one go. I didn't want to risk getting one piece of the face perfect, then trying to mould another piece of the face and messing up the first part I did, so this is why I decided to do it in stages. After I baked the first piece, it came out looking like this...


It was very egg shaped and I wanted it to make it look more skull shaped. After all, the head has to have a neck slotted into it so therefore it needed to have some type of skull back to it. This is what this little foil cap is for. I was trying to build upon what I had already. I'd read and been told that Sulpey is very build-able, and yes...it is to a degree but being a little optimistic I expected a flawless join between the two separate parts (which I didn't get) but hey...


I repeated the same process with the chin here - made it from foil, covered it in Sculpey, joined/blended the piece onto the previously baked face and then put it back in the oven at 90c for another 10 minutes to create one shape. 


Next I moulded a nose on. This piece I didn't make from foil, just Sculpey and then I put it back in the oven. 


Once the nose was baked, my next plan was to figure out how to do the eyes. This is where I realised - oops! I should of pressed into the clay to make the eyes deep-set, but at this point the clay had been baked and set hard so I couldn't change it. This is when I knew I'd be making Alfred number 2 and kicked myself for not thinking of this before hand. I should have referred to my drawing! I stuck two little bead eyes on with Blutack just to see what they would look like.


Next, I gave Alfred some eye bags and some ears. These were smoothed on and baked using the same process as the nose. 

After that, I decided it was time to move on to Alfred number 2...

Thursday, 23 February 2012

Project Innocence! Pre-Production is GO GO GO!

It's arriiiiived! Unit 9! I've been waiting all year to have the official green light for this project, and now systems are GO! I'm working in a team of five people as set designer, character designer, prop maker and script writer. These are big roles and a lot to take on, but I'm absolutely loving it! I'm lucky enough to work with two very good friends of mine who I've wanted to work with for a while now. You can check out their blogs here....

Cheryl Walker
Ashleigh Hutchinson

I've spoken about it before, but I'll just do a recap! Innocence' is the working title for a stop-motion movie myself and four others are working on. It's set in the 1950's about a little girl named Innocence who goes with her brother to stay at their grandparent's house. Innocence loves to explore and the story follows her into the attic where she comes across a box of voodoo dolls! Little does she know, whilst she's playing with the dolls that these are representations of her family. Had she of known that, she wouldn't of been pulling their arms and heads off! She's unaware of everything that's going on until she goes downstairs to show them what she found and finds her family splattered about the house! Mwahahaha!

So after a long time talking about this project and scribbling out ideas, it's exciting to now see things coming together in real form. Check out these props Cheryl made!


Alfred's chair! 


The making of the set! The next stage is to fit hardboard around the edges so we can then put up the wallpaper. Then we'll add the furnishings before we can move them in! 

Lil biddy jam jar made by myself, with real jam - and that odd bit of butter that somehow seems to get in the jar. Whoops!


The fireplace in the making! I did this with two pieces of polystyrene covered in a brick work type paper I found and thin pieces of wood painted with acrylics.